• Skip to main content
  • Skip to header left navigation
  • Skip to header right navigation
  • Skip to site footer
  • Facebook
  • YouTube
  • Pinterest
  • Newsletter
  • Account
  •  
  • Notebook
James Williams

James Williams

Historical Tailor

  • Shop
  • Contact
  • About
  • Historical Tailoring Masterclasses
  • Tailor’s Notebook
  • Shop
  • Cut and Stitched
  • Contact James
  • My Account

Developing the Tailor’s ‘Rock of Eye’

2 October, 2018 by James Williams

If one enters the world of tailoring (in any era), it is usually not long before you hear of some mythical era of tailoring when tailors could do everything with regards to drafting and fitting with their ‘rock of eye’. They could probably even make an entire suit with their ‘rock of eye’ just by looking at it, if one believes all of the hype surrounding the notion! But what is ‘rock of eye’ really, and is it of any use to the amateur tailor or home sewer who is making historical clothing for himself or a few customers? In this article I hope to shed some light on the technique and how you can apply it to your everyday sewing.

What is Rock of Eye?

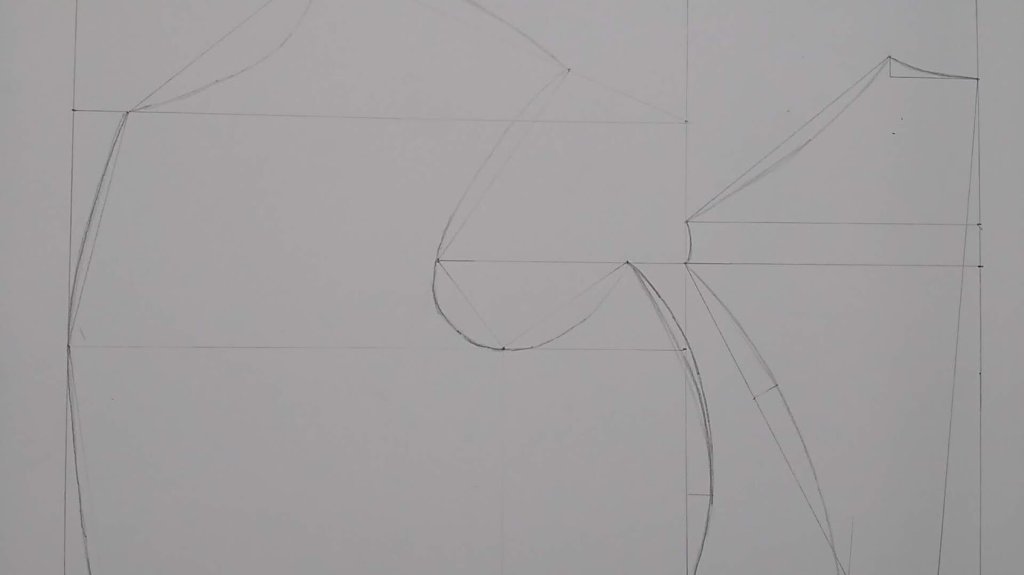
During the fitting process, there are two methods used for the most part. From the ‘scientific’ end, you have patterns and drafting systems of varying complexity, focused on specific and accurate measurements, everything laid out very mathematically and precisely. On the ‘artistic’ end, you have the ‘rock of eye’ methods and techniques such as draping, which rely less on perfect measurements and more on the fitting process and the skilled human eye. Certain points will be measured out directly on the cloth and then the rest of the details and lines are added freehand. It may be a remnant of techniques used before systems of drafting were in use and everything was draped. Whatever the case may be, there are definitely some benefits to developing your own ‘rock of eye’ in order to supplement your current drafting and fitting skills.

Observing your clients

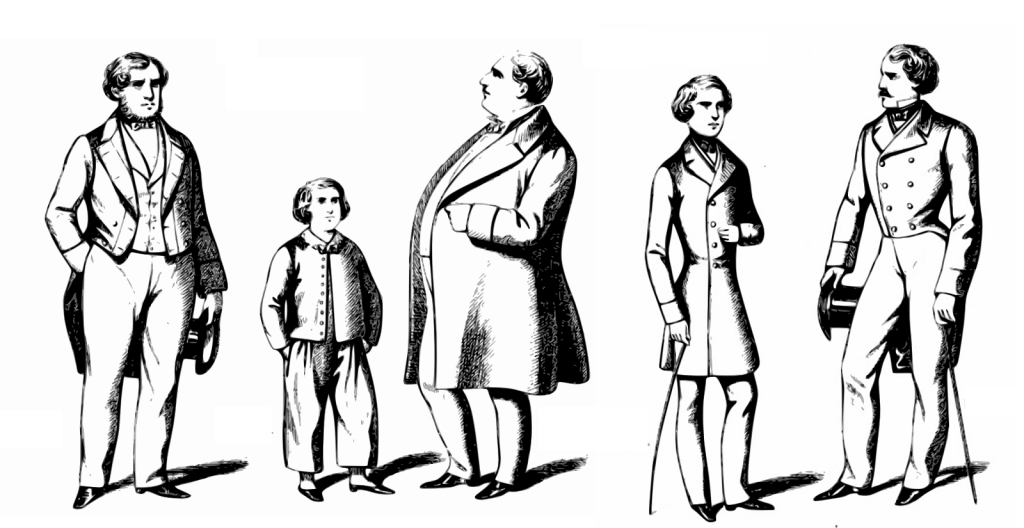
The first opportunity in which to develop your rock of eye is when measuring clients. Before pulling out the ruler, perhaps while discussing various matters related to your current project to distract your client, give a quick look at the shape of your client and the way he stands. Is he tall or short in stature? Thin or corpulent? Do his shoulders slouch forward or does he stand more erect in posture? Is he bow-legged or have knocked knees or a normal stance? It’s good to make a note on all of these aspects as accounting for them while drafting will help make the fitting process go more smoothly later on. For instance, if you know the client is on the corpulent side, you will know roughly what the pattern should look like, at least after you’ve drafted a number of coats.

Another thing you can do to help keep these details fresh in your mind is to photograph the client from the front, sides, and rear, so that you can look back and compare the photo with your notes for better accuracy.

Measuring your clients

As you pull out your tape measure to measure your client, note the measurement you are about to take, say the chest, and then while looking at the client, estimate in your head what you think the measurement will be. Then take the actual measurement, state it out loud so as to help remember it, and write it down in your note book. Compare the estimated measurement with the actual measurement. How close were you? The more measurements on a variety of clients you can take in this manner, the better you will get at estimating, and it can help you avoid silly mistakes such as measuring from the wrong end of the tape measure. And this ‘rock of eye’ technique will further develop your eyes to aid in other aspects later on. Develop the firm foundation and build on top of that.

Drafting with Rock of Eye Techniques

When drafting, generally, points are laid out on a vertical and horizontal axis, corresponding to measurements you have taken. A good practice is to estimate where exactly the next point will be, without measuring, and then find the exact location using your ruler.

Where I find ‘rock of eye’ really comes in handing during the drafting process, is when there is some discrepancy in my measurements. Using a period system such as Devere’s, for example, or any system, really, there can be certain issues that can come up during drafting, that a trained eye can avoid. For example, using Devere’s system from 1866, often, the armscye wants to be drawn much too tightly on the bottom, due to the way the system works. I remember the first couple of times I came across this issue, and went through various fittings and many hours of work to get everything working correctly, whereas after I had trained my eye to look for the problem, and to know what a good armscye should look like, I can now spot the problem long before I actually get to drawing in the armscye curves, and correct it. This, unfortunately, comes after much trial and error and isn’t something that can be taught. Like anything, the more effort you and practice you put in to something, the more skilled you will become.

Drawing Curves

After you’ve laid out all the lines and points on your draft, it’s time to draw in the outlines and various curves, such as the shoulder, armscye, neck, and center front edge. Most drafting manuals will give you various measurements to help you lay out the curves, and that is good to rely on those while you are beginning in order to get a feel for what each curve should look like. But after you’ve gained some experience with the drafting process, it will benefit you greatly to learn to draw in the curves by eye. Visualize each curve first in your mind, and then using your arm as a compass, lightly sketch out the curve at first, and then darken the line as you solidify the shape you want. It will easily cut your time in half if you just sketch your curves free hand rather than using rulers and French curves and such.

Pattern Style Alterations

Once you have a base pattern drawn out and fitted, it’s time to add the various styling details to match the piece you are reproducing. I tend to look at pattern drafting in two stages. The first stage is to get the proper fit, and the second stage is adding the various style details. By separating the two stages, you can perfect each without distraction.

When copying an original garment, say a coat, it’s very helpful to be able to examine and take measurements in person. But all too often, all we have to go on is a photograph or perhaps a fashion plate. It is in these cases where ‘rock of eye’ comes in handy. Looking at a photograph, you can estimate the width and height of the lapels and gorge line, how wide to cut the sleeves, pocket positions, distances between buttons and other points, and more, and then apply those estimates to your draft. These can easily be drawn freehand with one or two checks for measurements once you are used to the process.

How far can Rock of Eye be taken?

There seems to be a spectrum in play with pattern drafting and fitting. On the one end, you have the more ‘scientific’ systems, which take great pains to lay out each point down to the millimeter or 16th of an inch, everything perfectly mathematical, with little need for artistic interpretation. Modern systems, such as the German Runschau system, seem to take this approach. On the other end, there are those ‘rock of eye’ tailors, who with just a few measurements, draft right on the cloth with ease, emphasizing more of the artistic side. Here’s one such example from an English bespoke tailor. It’s just fascinating to watch!

For most of us though, our approaches will fall somewhere in the middle, relying on basic period drafts to get the basic pattern and fitting down, and then using our artistic side to make those patterns come to life with a period reproduction that looks just like the originals. It also depends a great deal on one’s personal temperment; for example, I am greatly inclined toward the more scientific approach, yet there comes a point where the nitpicking and fiddling over numbers gets to be too much so I allow that artistic ‘rock of eye’ to take over. And it usually solves the problem a lot quicker. Your own approach will no doubt differ from my own, and it is up to you to find the right balance for yourself as you develop the above techniques. I hope this has been of help to you in your tailoring journey. If you’ve found success in these methods, have some additional ways to work on your ‘rock of eye’, or have any questions, please let me know in the comments!

Sharing is caring!

  • Facebook
  • Twitter
Category: Featured Articles, Tailoring, Techniques

About James Williams

James Williams has been tailoring historical reproductions since 2007.

Previous Post:Constructing Embroidered Covered Buttons
Next Post:Sewing with a Tailor’s Thimble

Reader Interactions

Comments

  1. Patrick Smith

    2 October, 2018 at 8:37 pm

    I’ve experienced similar results with the armscye using Devere’s, but after taking several patterns directly from original garments I think the problem is less often the system and more our modern interpretation of the fit. A lot of customers feel the armscye is too tight and maybe that’s because they’re too used to modern suits having a huge gaping hole instead of the mobility a tight armscye provides. Neither are a rule, it just depends on the customer I suppose.

    Reply
    • James

      2 October, 2018 at 9:13 pm

      I’ve had many comments about the armscye being too tight as well. Definitely a lot to do with being used to the modern suits. Though in the article I was referring to a different issue. If one miscalculates the measure for the side and starts at the wrong position in relation to the back, it’s easy to make the armscye even smaller, so that it almost looks flattened. I’ll update the article with a photo if I can find one.

      Reply

Leave a Reply Cancel reply

Your email address will not be published. Required fields are marked *

Contact

Get in touch with me here

james@historical-tailoring.com

  • Facebook
  • Pinterest
  • YouTube

Navigation

Cut and Stitched

subscribe to my newsletter

© 2009 – 2022 James Williams